Showing posts with label dadenu. Show all posts

3 February 2021

DadenU and SocialVR Try-Out: Spatial


As part of my DadenU day I thought I'd try out another SocialVR environment - this time Spatial (not to be confused with vSpatial which is a VR "virtual desktop" app). Spatial is downloaded as an app onto the Quest. The web client only works in "spectator" mode rather than giving you a full avatar presence.

A really nice touch is that your available "rooms" show as little mini-3D models to choose from (see above). However this doesn't look to be scalable as they are a fixed selection of shapres and actually only emphasises the pre-canned nature of the environment.

Another "USP" is that it takes a webcam image to generate your avatar. OK I didn't try to optimise it and was probably look up too much but the result was very uncanny valley... And you can see from the arm position why many apps have gone for only head-body-hands, missing the arms.


There are a number of fixed office/meeting room type environments to use, but no option I can see at the moment to make your own. There is a big display board, but it wasn't really clear how that worked. "Spectators" appeared in world as their webcam feed above the board. You could separately rez post-its, a shared web browser, images from your desktop etc. There's also a library of 3D models which I guess you can add to - but not too obvious how.

Navigation seemed very clunky with step wise rotation on the joystick - hard to manoeuvre in a space which albeit small is still larger than my room to freely wander in VR in.

And that's sort of it.

As a step towards a very business orientated VR space it's not bad, if they can improve the typical avatar capture to the quality that seems to be in the promotional shots that would be great, and a scalable version of the room models would be wonderful to see more widely. But why be a slave to the real-life model - their "Mars" planning room has a small model of a crater, and a small model of Curiosity - why not have both full scale (and the crater small scale) and have the meeting on Mars?

Here's my initial take on Spatial plotted on our radar diagram, and below some key thoughts on each measure.


  • Accessibility/Usability - Headset download, reasonably intuitive but clunky movement
  • Avatars - nice try at scanning but pretty uncanny valley
  • Environment - nice looking but fixed and few
  • Collab Functions - reasonable starter set but could improve
  • Multi-Platform - really only VR for full functionality
  • Object Rez - fixed library only? 
  • Open Source/Standards - doesn't seem it
  • World Fidelity - none, non-persistent rooms
  • Privacy/Security - room ownership/invites only
  • Scripting - none


10 November 2020

DadenU Day: NodeJS NLP and Grakn


Over the last few months we've been looking at alternative to Chatscript and Apache Jena for chatbot development. We really like the chatbot-knowledge graph architecture, but we've found Chatscript too idiosyncratic for our purposes,  and lacking any solid scripting/programming capability, and Jena a bit buggy and limited.

On the Chatbot front we've had a play with all the standard offerings, all Machine Learning (ML) based, including Dialogflow, Microsoft LUIS, RASA, IBM Watson etc. In most cases it wasn't the performance as such that we found wanting but rather the authoring. All of them seemed very fiddly, with no proper "authoring" support (just coding or tables), and in several cases the intent-pattern-action grouping that is the core of the ML part was split over multiple files so authoring was a real pain (with RASA some people were even writing their own Python pre-processors so they could work with a more logical layout that then spat out the RASA format).

For the knowledge graph Neo4j looked a very good solution, looks fantastic and lots of capability. It doesn't have a "pure" semantic triples model, but through the neosemantics plug in it would read out Turtle files and work more like a triples store. But we then ran into deployment issues, with the plug-in not available on the community edition, the server hosting need certificates for clients as well as server, and the hosted version being very expensive as you're billed all the time the server is up, not just when used. We might come back to it, but at this stage the challenges were too great.

So our front-runners have ended up as NodeJS for the NLP side of the bot, and Grakn for the knowledge graph/triplesbase, and DadenU gave me a day to play with them a bit more, and get them talking to each other!

NodeJS

NodeJS is the "server" form of Javascript. There's a lot to love about NodeJS - it's good old familiar Javascript and feels relatively lightweight - in the sense you're not weighed down with IDEs, modules for everything and lines of code that you just have to trust. There is though a very full module library if you want to use it, and its robust and eminently scalable.

For NLP there are libraries that include both takes on Machine Learning intent-action style chatbots and traditional part-of-speech NLP analysis. The nice thing is that you don't have to choose, you can use both!

For ML there is a wonderful library released into open-source by Axa (the insurance people) called simply nlp.js which takes a standard RASA/LUIS/Watson ML approach but everything is controlled by a simple single data object such as:

{
      "intent": "agent.age",
      "utterances": [
        "your age",
        "how old is your platform",
        "how old are you",
        "what's your age",
        "I'd like to know your age",
        "tell me your age"
      ],
      "answers": [
        "I'm very young",
        "I was created recently",
        "Age is just a number. You're only as old as you feel"
      ]
}

You can have as many as you want, spread these over multiple files, and having everything in one place makes things dead easy.

Then there's another library called Natural from NaturalNode which provides Parts-of Speech Tagging, stemming and other NLP functions. Adding this to the bot meant that I could:

  • Use Natural to identify discourse act types (eg W5H question etc)
  • Use Natural to extract nouns (which will be the knowledge graph entities)
  • Use Natural to do any stemming I need
  • Use Axa-NLP to identify intent (using "it" and a dummy word in place of the noun) and pass back the predicate or module needed to answer the question
  • Assess NLP confidence scores to decide whether to get the answer from the knowledge graph (if needed) or a fallback response.

Grakn

Grakn is a knowledge graph database which you can install locally or on the cloud. Most of it is open source, just the enterprise management system is paid for. There is a command line database server (core), and a graphical visualiser and authoring tool (Workbase). 

With Grakn you MUST set up your ontology first, which is good practice anyway. It is defined in GRAQL, a cross between Turtle and SPARQL, and which is very readable, eg:

person sub entity,
  plays employee,
  has name,
  has description,
  has first-name,
  has description,
  has last-name;

Data can then be imported from a similar file, or created programmatically (eg form a CSV) - and in fact the ontology can also be done programmatically.

$dc isa product,
    has description "Discourse is Daden's chatbot and conversational AI platform which uses a combination of machine-learning, semantic knowledge graphs, grammar and rules to deliver innovative conversational solutions.",
    has benefit "Discourse seperates out the tasks of language understanding from content management, so clients can focus on information management, not linguistics",
    has name "Discourse";

With the data entered you can then visualise it in Workbase and run queries, visualising the data or the ontology.


Interfacing NodeJS and Grakn

Luckily there is a nice simple interface for NodeJS to Grakn at https://dev.grakn.ai/docs/client-api/nodejs. This lets you make a GRAQL call to Grakn, retrieve a JSON structure with the result (often a graph fragment), and then use as required.

const GraknClient = require("grakn-client");

async function graql (keyspace, query) {
const client = new GraknClient("localhost:48555");
const session = await client.session(keyspace);
const readTransaction = await session.transaction().read();
  answerIterator = await readTransaction.query(query);
const response = await answerIterator.collect();
await readTransaction.close();
await session.close();
client.close();
return(response);
}

(Re)Building Abi

So I think I've got the makings of a very nice knowledge graph driven chatbot/conversational AI system, leveraging Machine Learning where it makes sense, but also having traditional linguistic NLP tools available when needed. The basic flow is an extension of that presented above:

  • Use Natural to identify discourse act types (eg W5H question etc)
  • Use Natural to extract nouns (which will be the knowledge graph entities, we can do our own toeknisation for compound nouns and proper names)
  • Use Natural to do any stemming I need
  • Use Axa-NLP to identify intent (using "it" and a dummy word in place of the noun) - typically the predicate needed of the noun/subject entity in order to answer the question, or a specialised module/function
  • Make the Graql call to Grakn for the object entity associated with the noun/subject and predicate
  • Give the answer back
Of course having a full programming language like NodeJS available means that we can make things a lot more complex than this.

As a test case of an end-to-end bot I'm now rebuilding Abi, our old website virtual assistant to see how it all fares, and it it looks good we'll plug this new code into out existing user-friendly back end, so that chatbot authors can focus on information and knowledge, and leave Discourse to look after the linguistics.


8 June 2020

Daden U Day: My Beautiful Soup

From Darrell Smith:

On a recent project we had difficulties in scraping the summary paragraph from Wikipedia article pages and Beautiful Soup was suggested as a possible tool to help with this.  The Beautiful Soup Python library has functions to iterate, search and update the elements in the parsed tree of a html (and xml) document.


So download and install the library do a quick test was to fetch the URL of the web page we’re interested using the ‘requests’ HTTP library to make things easy. The http document is then passed to create a ‘soup’ object,.

result = requests.get("https://en.wikipedia.org/wiki/HMS_Sheffield_(D80)")

src = result.content

soup = BeautifulSoup(src, 'lxml')

print(soup)


The prettify # makes the html more readable by indenting the parent and sibling structure

print(soup.prettify())


Searching for tag types (such as ‘a’ for anchor links) is simple using ‘find’ (first instance) or ‘find_all’,  this shows all internal (Wikimedia links) and external links (“https://”)


Lets just get links that refer to “HMS …”


Now lets get the text paragraphs we’re interested in, this can be done using the ‘p’ tag


Then index to 2nd paragraph using list to get summary paragraph (n.b. first paragraph is blank) we’re after.


Dedicated Wikipedia Library

While Beautiful Soup is a good generic tool for parsing web pages, it turns out that for Wikipedia there are dedicated python utilities for dealing with the content such as the Wikipedia library (https://pypi.org/project/wikipedia/) which wraps the Wikimedia API simply


wp.search(“HMS Sheffield”) returns the Wikipedia pages for all incarnations of HMS Sheffield, and we can use wp.summary(“HMS Sheffield (D80)”)  to give hte element from page we’re interested in.

The wp.page(“HMS Sheffield (D80)”) also gives the full text content in a readable form with headings.


Again we can select the first paragraph for the summary (exclude URL), and possible use other paragraphs using the headings as index/topic markers.


Smart Quotes!  While trying this out I also found a useful function to get rid of those pesky Microsoft smart quotes causing trouble in RDF definitions on the same task. Unicode, Dammit converts Microsoft smart quotes to HTML or XML entities:


19 May 2020

DadenU Day: GraphQL

From Steven:

GraphQL is a data query language to make it easier and more intuitive to use APIs. Existing APIs use fixed endpoints to give the user what they want, however, the fixed nature means that that endpoint can give too much or too little information. These are called over-fetching and under-fetching. Over-fetching uses more intensive database calls on the server and more bandwidth, whereas under-fetching requires more API calls and more complexity on the client. GraphQL allows the user to define what data they want.

I used a prewritten example to experiment with this in the C# library GraphQL for .NET. The example includes a nice GUI playground to test queries. An example GraphQL query is show in Figure 1.


Figure 1:An example query from the playground.

The GraphQL query consists of a type “query”, a name “TestQuery”, a reference to the query to query “reservations”, a list of arguments to the query, and a list of fields to include in the result. This allows the ability to include only the fields you want and no more. It is passed in a standard get or post request to /graphql by default, so very easy to use.

The result of this GraphQL query is shown in Figure 2. It is in JSON format so is easily read by humans and easily parsed with standard libraries. It looks similar in structure to the query, which allows quick checking of the results.


Figure 2:The result from the query in Figure 1.

The example uses a simple hotel reservation system with rooms, reservations and guests. Each of these has its own C# class as normal. To make the GraphQL classes, we need to define a new ObjectGraphType that takes the existing type as a generic parameter as in Figure 3.


Figure 3:The reservation ObjectGraphType. It takes the existing Reservation type as a generic parameter, but fields still need to be defined in the constructor.


Each property in that type must then be given in the constructor by applying the Field method to it. Complex properties are defined manually by giving the type as a generic parameter and the string for querying, though this seems like a library limitation.

A GraphQL query is defined as another ObjectGraphType where the Field method defines the name of the query, a list of arguments to pick up on, and a resolve method that is called to resolve the GraphQL query using the defined arguments. This is shown in Figure 4. The return type is a List of Reservations as expected, but each type is its counterpart in GraphQL.


Figure 4:The reservation query. The argument and resolve parameters are defined unlike in Figure 3.

The resolve function gets passed a context, which contains all the arguments and subfields from the GraphQL query. In the function you can then build up a query to access data depending on what is in the GraphQL query. The arguments can end up triggering complex filters, not just equality checks, and could include sorting.

In GraphQL, there are not just “queries”, there are also “mutations” that allow data change, and “subscriptions” that allow real-time updates. These are wrapped up in a schema, although I am only using queries here. The schema is shown in Figure 5.


Figure 5:The schema used in the example.

All these classes are made available through dependency injection in Startup.cs as shown in Figure 6. Every GraphQL type needs added, and the Query is retrieved in the Schema through the service provider.


Figure 6:The Startup.cs showing the level of dependancy injection required.

The resolve function was originally a list of if-else statements with similar structure. I changed it to a series of chained calls to the same function to remove code duplication and improve readability. I also added conditional inclusion so that the extra fields are only included if they exist in the GraphQL query. This cuts down on the cost of database calls. These methods are shown in Figure 7.

Overall GraphQL is something I will consider in a future project. Once the initial hurdle has been overcome it is powerful, and can be backed up by a standard API if necessary.

Expressions


Figure 7:IQueryable extensions to enable conditional including and generic equal functions.

I wanted to be able to pass a lambda to select a field in the class, a string for the argument and a list of validation functions with messages. I am using Entity Framework Core (EF) to do the database calls, so to avoid execution of the query until the end, I had to write the lambda as an expression. Expressions are the form the C# compiler keeps the function logic until they are compiled and are also used by EF to translate queries into SQL, instead of C#.

In C# you can define a lambda as an Expression<Func<>> and C# will automatically convert the lambda into an expression. However, building on an expression requires you to use the expression tree API and define every little part of the lambda including parameters to build up the tree. In the AddEqual method, you can see the method I wanted to write commented out at the end of the return line. The expression tree building took four statements to build up, by defining the next small bit of the function its own statement. In the end though, it allows the same method to be used for a generic type where you want to check equality in an EF query.

As an aside, checking equality generically for all types in a function (value vs reference, nullable vs non-nullable) required a call to EqualityComparer<T>.Default.Equals(x, default) instead of just using == or .Equals().

In the Include function I had to pass an expression and examine the PropertyInfo to check if that property exists in the subfields.

8 May 2020

DadenU Day: The Design of Everyday Things

For Krish's DadenU day the other week Krish looked at Don Norman's influential book, The Design of Everyday Things.


If you have ever pulled a door instead of pushing it, if you have ever been unable to figure out how your microwave works beyond its basic functions and you struggle with those too, and if you get frustrated with software because you cannot get it to do what you want it to do then you are certainly not alone. These experiences can often leave you feeling a little stupid and give the impression that it is your fault for not using things correctly.

Don Norman, in his book, The Design of Everyday Things, would argue that it is not your fault and you should not be the one feeling stupid. He goes on to say that it is the fault of the designer for failing to design for humans. Originally the book was named The Psychology of Everyday Things because it was challenging designers to think about human psychology or the way humans think and behave in their everyday interactions with everyday things. If designers could understand this, they would make better designed products to account for this human behaviour.

Don Norman thinks that design should go beyond finding the solution to a problem although this is a good starting point. Designers, engineers and software developers need to take into account that our thought is very much guided by our emotions rather than being rational. Emotions allow us to make value judgements, help us prioritise what is important and give us the ability to think intuitively as well. These emotional thoughts may be visceral which means they provoke strong feelings within us; they may be behavioural which means that we react positively, more often than not, to the familiar and less positively to the unfamiliar, and finally our emotional thoughts can be reflective which means we look back on past experiences, good and bad, which inform our choice, but we also have the insight to look at future possibilities.

So a successful product not only has to function correctly to solve a problem, but we must consider how we can make a product or design software that evokes positive emotions so that users enjoy the product, so that there is enough familiarity built in to make them feel safe and know how to use it intuitively, and finally it should evoke reflective emotions that are positive.

Don Norman would be the first  to admit that this challenge is not easy to respond to otherwise we would all be making amazing products. However Don Norman does suggest that we should spend more time observing people doing the things that they do with the tools that they use. We may find that often the problems that people have are not the root problem but a symptomatic problem due to poorly designed systems and tools. Spending time in observation may help us as designers to get a better insight into the root problem. It will also give us more insight into the way people behave providing us with the information we need to design better products. Designing for user experience is therefore a research based discipline at its heart.

Although Don Norman’s book is now more than thirty years old, the principles it outlines are far from out of date. Some of the best products in the world follow the principles outlined in his book.

29 March 2019

Daden U day - Slack integration

Writing to a slack channel.


At Daden we use slack to communicate with other team members and as a way of passing useful information, jokes and items of interest around the company.

An article on Code Project on how to communicate programatically with Slack grabbed my interest so for the February Daden U day I decided to see how difficult it would be to "talk to slack".

As it turns out it's actually really easy, all the information you need is here...

https://www.codeproject.com/Articles/1272964/Writing-to-a-Slack-Channel-NET-Core-Edition

From start to finish it only to about 15 minutes to have a simple example up and working, so a big thanks to Ryan Peden for writing the article.

Now we are able to write to Slack the next step is deciding what we can do with it. At the moment thoughts are along the lines of getting notifications when web sites throw exceptions as well as integrating some of Daden's many chat bots.


11 March 2019

Daden UDay: Chatbots and Autonomous Avatars in Second Life


For my DadenU Day I spent the time revisiting our code for controlling autonomous avatars in Second Life. The system currently uses the Corrade service (although I had a look for something better), which is certainly a lot more stable than when we last used it a couple of years ago. Corrade is very much an avatar controller, it has no smarts itself (so is like LibOMV in that respect), so we built a small LSL script to provide the interface from Corrade back to our Chatscript server which now forms the core of the bot's brain. The pathway is below:


The first task has been just to re-establish existing functionality before we move on to new stuff. The LSL script reported memory errors (you only get 64k!), so we stripped out the nice-to-haves and got the core working from bot to Corrade to LSL to Corrade to bot.

To get the other functionality back in we have to use an old LSL technique of putting the extra chunks in a new script and then using the llMessage function to call with a set of parameters - very messy as you can't pass much, but still the only way to do it in LSL which has no concept of a script library, shared scripts, or a script to script API!

The final bit was talking to Chatscript. Iain sorted a plain REST API into our Chatscript environment, I uploaded the old Abi (our virtual receptionist) files to the server, and finally we had the whole path with a user in SL being able to ask the Abi/Halo avatar questions about Daden.

Next steps are to start to build some of the Halo "brain" into Chatscript, porting some of our earlier Discourse work, and maturing the LSL interface. The aim is that by December 2019 we'll actually be beyond where we were with this in December 2009 when we were finalists in the BCS Machine Intelligence Competition!


9 April 2018

Daden U Day: GeospatialAR - Take 2


I spent the latest DadenU day doing some more work on the AR app I started last time. Like the recent OS feature this is a geospatial AR app, so it puts markers in your smartphone viewscreen which align with real world objects. As you pan around you see different objects, and if you move to a new location all the markers track the objects they are pointing at.

The driver for the project is a personal "need" to have such an app to support battlefield walks, but we can also see some commercial potential for it, as well as more formally exploring the battlefield tours angel with the Battlefields Trust of which I'm a member.

In the latest session I focussed on bring the data in from the web, rather than having it hard coded within the app. This meant developing a JSON format for the data, doing a fetch by web service request, and then feeding the data to the existing plotting routine.

Getting my head around JSON took a fair amount of time, I much prefer, XML, and most of the rest was fairly trivial. Where I got stuck at the end though was creating a dynamic drop down of the available locations based on the files on the web server - will have to ask one of our pros how to do that!

Over the next couple of months I hope to work it up to a full blown demo based on a real battlefield, and then we'll see where we can take it.


Creating a Blockchain

For Daden-U day that took place in February I chose to look into a technology that’s on everybody’s radar. Blockchain is being touted as the next big thing and becoming a buzzword for business. A block chain is a is a continuously growing list of records, called blocks, which are linked and secured using cryptography. Blockchain is synonymous with cryptocurrency because blockchain is the underlying technology of cryptocurrencies such as Bitcoin and Ethereum but there are other uses for Blockchain. Blockchain is still a young technology and it goes without saying that the world still figuring out whether is a solutions looking for a problem outside of cryptocurrency. To gain of a better understand of what blockchain is, its usefulness and how we can integrate it into our products I decided to create my own blockchain called UncomplicatedChain using a simple console application in c#. Different blockchains have different structures depending on their purpose. To keep things simple I decided to have the only the necessary elements in my blocks.

  • Index – The block number, so we know how many blocks are in the chain
  • Hash - The blocks Id (identification document) which is long list of numbers and letters. This is generated using index of the block, the hash of the previous block, timestamp and data. This is so that we can keep the integrity of the data. It should be noted that this hash has nothing to do with “mining”, since there is no Proof Of Work problem to solve.
  • Data – The information we want the block to store
  • Previous Hash – This essential creates the chain by storing the id of the previous block. We can also use the previous has in our validation process to check the integrity of a new block or a new chain. At any given time we must be able to validate if a block or a chain of blocks are valid in terms of integrity. This is true especially when we receive new blocks from other nodes and must decide whether to accept them or not.
  • Timestamp – Stores the date and time the block was created
I won’t go into any technical detail about the rest of the implementation of my UncompicatedChain as there are many tutorials for developing a blockchain. My take away from this exercise is that blockchain is a simple but powerful technology that certainly has its uses. For us as Daden the best use may not be so obvious. One way in which we could use blockchain is with our product Fieldscapes. Fieldscapes is a service which lets educators create and share 3D and VR immersive learning exercises. Fieldscapes includes a user generated library of locations and objects, and an easy-to-use editor. Fieldscapes could track changes to made exercises. Another use could be keeping track of location and object use then using this data to reward content creators.


18 December 2017

Geospatial AR - Building Your Own!


For ages now I've wanted to have an app that would display points of interest on my smartphone screen overlayed with the real world view. The new OS AR layer (above) and Yelp Monocle (below) do the sort of thing I want, but I want to be able to define my own locations, and maybe some custom functionality.


After a couple of fruitless web and App/PlayStore searches I couldn't find what I wanted. Wikitude was closest, and so were several GIS related offerings, but it was going to be several hundreds of pound to "publish" my dataset. I then looked at mobile development frameworks (e.g. Corona) several of which appeared to offer an AR option, but really only just marker based, not geospatial AR. So by about 1030 on DadenU day I realised I was going to have to roll-my-own. I'd found a nice tutorial (Part 1 and Part 2) and so, without having ever developed a Java app or mobile app decided to give it a go.

It took about the next 3 hours to install Android Studio and all its updates. Moving the tutorial across didn't take long, but the app kept crashing on start-up. I then realised that I needed to manually set the GPS and Camera positions! Did that and the app worked.

All the app did though was put a marker on the centre of the screen when the camera pointed in a particular direction. I wanted the OS style though - markers that stayed on screen and slid around as you moved the phone, and a whole host of them too.

A bit of maths, some searching on CodeProject and I soon had the basic operating mode changed, one marker, sliding around and just about aligning with the target. The hardcoded about  dozen markers and got them working. Here's a screenshot of that stage, with the icon that came with the tutorial. The other thing I added was that markers were smaller if more distant.


That was about the end of DadenU day, I had the core app working but I wanted more. So over the next few evenings I:


  • Moved from hard coded markers to an internally selectable dataset
  • Added some on-marker text
  • Made new markers of different shapes
  • Added ability to set marker shape and colour based on fields in the data
  • Added option to move markers in the vertical plane based on distance as (OS/Yelp)
  • Added the ability to filter on a type parameter (again as OS)
That got to about here:


I also added the ability to spoof the phone GPS location, so it would pretend you were in the middle of the dataset - so here the centre of the Battle of Waterloo - but physically on the office car park.

I then wanted to add some very specific functionality. As you might guess from the last sentence one of my use cases for this is battlefield tours. So not only are there fixed locations but also moving troops. So I wanted a time slider that you could use to set a time in the battle, and then have the unit pointers point to the right place. The time slider is at the bottom of the screen for relevant datasets, with the "current time" displayed see below.


A final tidy up of the menu icons and this is the current version:


I've even added voice description for the icons, and arrows that point you in the direction of a featured icon, with description linked to time so using the slider and some VCR controls it can walk you through a spatial narrative.

Next up on the to do list are:
  • Click on an icon to see (or hear) full data
  • Load data from  a web server
And that should pretty much give me my minimum viable product.

We're already talking to one potential client about a project based around this, and can see how it might fit into two other projects (giving an alternative to viewing the data in VR if actually on-site). We'll keep you posted as it develops. At the very least I'll start using it for some of my own battlefield walks.


8 December 2017

Automating Camera Directing in Fieldscapes

Fieldscapes has the potential to be a very flexible platform when it comes to content creation, and when David was busy recording a video of it a potential use case for the application crossed my mind - would it be possible to direct a video within a Fieldscapes exercise by automating camera positioning? This would allow for a variety of uses, such as exercise flythroughs to video recordings, and that's why I decided to look into the idea for the last Daden U day.

Firstly I had to remind myself about the current capabilities of the cameras before I added any new functionality. I created a new exercise and added a new camera to it. On the camera panel, you can see some of the options we have for setting up the camera - we can rotate horizontally and vertically, as well as adjusting the field of view of the camera. There is the option to change to orthographic projection, but I wasn't going to be needing that.

Camera menu.
The first idea that came to mind was that being able to alter the field of view via PIVOTE actions would be very powerful. That feature isn't currently implemented but I put it on my list of potential improvements. The other idea that popped into my head was the ability to alter individual rotation axes via PIVOTE actions, to allow more subtle control of the camera than is currently available.

Now that I had looked at the camera set up options it was time to remind myself of what PIVOTE can do with the cameras. So I went to edit one of the default system nodes to see the available actions. As
]#u can see from the image below, it is very limited - you can only alter whether or not the camera is active. This would have to change drastically if I was to be able to do what I wanted to.

Old camera actions.
Automating the camera position and movement would require cameras be able to use some of the actions available to props, such as the ability to teleport to, or move to, the position of a prop or the ability to look at a prop within the environment. Some new actions would also nice, such as one to change the field of view as previously mentioned.

To help determine what actions I was needing I decided to choose an existing exercise in Fieldscapes and design a camera 'flythrough' of the exercise in the same way some video games would perform an overview of the level before the user begins. After much deliberation the exercise that I chose to use was the Apollo Explore exercise developed to allow users to walk about the moon and learn about the Apollo 11 moon landing. This exercise has props spread around the environment which makes it easy to define a path we want the camera, or cameras, to follow.

Intended camera positions are circled.
Mapping out the positions I wanted the cameras to be at during the flythrough was the first step I took. I decided on placing two extra cameras in the environment - one to be used to look at the user avatar and one to move around the props. This would give a nice fade to black and back when switching between them. I wanted to slowly pan around the user avatar at the start, followed by the camera showing each of the main pieces of equipment before ending on the lunar lander itself. After this, the exercise would start and the camera would go back to a third person view.

After plotting out all of the positions and directions I wanted the cameras to go to I decided on how I wanted to transition between the positions so that I could determine what actions I would require. As I wanted to smoothly pan the camera at the start around the avatar, the most obvious action I would require is one that would move the camera from one position to another over time. I added 3 actions to the cameras that are present in props that I felt were most useful - MoveTo, TeleportTo, and LookAt. To linearly interpolate from the current camera position to that of the arrow I placed that points to the avatar's head we would use the MoveTo command.

New camera actions.
I set up a timer that would trigger the camera facing the avatar to move to one of the arrows after 1 second had passed, and I would use the same timer to move the camera to other positions after more time had passed. Unfortunately this is where I hit a snag - there was a bug with the way the camera was trying to raycast to the ground when moving between positions, causing it to slowly move upwards into space forever. I ran out of time and had to head home before I managed to find the cause of the issue, so it was at this point where my experiment had to stop for the time being.

In conclusion, I do believe that if the breaking bug I discovered towards the end of the day can be fixed then there is a great chance that the ability to automatically move cameras will be functional within Fieldscapes. I'd also like to develop a PIVOTE action that could transition the field of view of the camera over time - perhaps then we will see a dolly zoom replicated in Fieldscapes!

Oops!


1 December 2017

Fieldscapes Exercise Visualiser - Daden U Day


For the Daden U day I decided to create what I call the Fieldscapes Exercise Visualizer. The aim of the visualizer is to create a graphical representation of a Fieldscapes exercise. The idea came about while creating a complex Fieldscapes exercise, I was struggling to quickly recall the structure of the exercise, the Props, Prop Commands and their relationship with Systems Nodes. Another reason for creating the visualizer was to have a way of explaining the flow of the exercise from begin to end. If it a non-linear exercise they different paths can also be illustrated.


Before beginning work on the visualizer I had a few ideas of how to illustrate the exercise using symbols and shapes. Fortunately I discovered a web application called draw.io whilst trying to created a flow diagram manually using pre existing tools. Initially I had attempted use Umlet which is windows application for drawing UML diagrams but decided against it. Reason being that a web application would be more accessible. As a web application I could integrate it into the Fieldscapes Content Manager reducing the number of tools content creators have to access to make full use of the Fieldscapes ecosystem.


Unfortunately draw.io does not have an API (Application Programming Interface). In my attempt to find a the API I discovered that it uses library called mxGraph. mxGraph is a JavaScript diagramming library that enables interactive graph and charting applications to be quickly created that run natively in most major browsers. mxGraph has a backend which supports the javascript application running on a server. This backend software can either use Java, C-Sharp(C#) or PHP. For the purpose of the U Day I used the C# backend as Fieldcapes is written in C#.


After downloading the source code for mxGraph from the Github repository. The source code contained an example C# .Net website. The solution worked right out of the box without an issues. Fortunately because of work done for the Fieldscapes Editor most of the code needed to read Fieldscapes exercises stored in XML was already written so all I needed to do was write a couple of functions that extracted the data I needed to represent the various elements of an exercise as geometry with connecting lines. Extracting the data was a breeze however progress grinded to a halt when I tried to draw different shapes to represent the various elements of an exercise such as props, system nodes etc. After some trial and error and lots of googling I managed to understand how to style the vertex which is the word used in mxGraph for the geometry that are draw on the canvas.


From what I saw of the documentation and my brief time using mxGraph, mxGraph is a powerful library that has many affordances for those who want to create diagrams of any nature. It allowed me to create a diagram(see image below) that showed all the different elements of a Fieldscapes exercise with line indicating their relationships with to each other. The next step create some form of structure for the diagram. Development on the Fieldscapes Exerciser Visualizer is not a priority at the moment but it something I intend to continue working on until it becomes more useful at which point it will be integrated into the Fieldscapes Content Manager.


2 November 2017

C# as a Scripting Language - and in Fieldscapes?

By: Iain Brazendale

Daden U days give me the opportunity to play with ideas that have been floating around at the back of my mind for some time and this Daden U day was no exception.

I’ve been reading good things about the changes Microsoft have been doing to their .NET complier platform “Roslyn” particularly with regards to adding scripting support. It was this combined with thoughts of how we could easily add additional functionality to Fieldscapes that made me decide it was time to take a deeper look at scripting.

The advantage of scripting provided through .NET compiler is that there’s no need to learn yet another scripting language, scripts are simply written in C# but with looser syntax requirements.


Following the article quickly gave me a rough working console application to do some testing with:


This example shows accessing an array containing the names of images for different days of the week. The third query to me shows the real power of the script – here the day of the week becomes the index into the images and returns the correct images for the day of the week (You guessed it – I ran this example on a Tuesday). The ability to show a different image for each day of the week is not something that is ever likely to be baked into Fieldscapes, however, adding scripting support allows this new functionality to be added with a single line of script.

This example below shows how picking of images at random can be achieved.


However, with great power comes great responsibility… if we let users add their own scripts then they could take advantage:


Here we can see that users may access functionality that wasn’t intended, in this case displaying inappropriate messages. Also of note, as you can see from my several attempts to get the syntax right (C# is case sensitive), it could be fiddly for people to write scripts without the use of a good IDE correcting those minor typos. These issues suggest that scripting is something that should initially be left to the “advanced” users and more thought and design will be needed before it becomes a “typical” user feature.

So, when will scripting be added Fieldscapes? Unfortunately, scripting requires .NET 4.6 and Roslyn. Unity still uses .NET 3.5 with a non-Roslyn compiler so as wonderful as this technology looks it won’t be a scripting solution for Fieldscapes until the tech catches up. However, it could be a useful technology for Daden’s other products such as Datascape.


25 August 2017

Project Sansar - First Impressions


I've been signed up the Sansar Closed Beta for months but other projects meant I never had the time to go play. Now it's in Open Beta (and so we can talk about it) I thought it was about time I checked it out.

What Sansar doesn't offer (in comparison to SL) is a single shared world - this is far more a "build your space and let people visit" model. It also doesn't offer in-world building (just placement of imported or bought object), or in-world scripting (and scripting is in C++ and needs to be re-imported everytime you make a change, so it looks like a very long development cycle!). What is does offer is (as did SL) is multi-user (well at least multi-avatar), and VR support out of the box. Avatar choices are limited but look OK with some nice facial customisations, but only about 8 outfits (and no colour options!).

VR and using the teleport movement - see light beam

The navigation model is horrendous (in my view) - the camera usually giving a sideways view til you'd been walking for ages. You couldn't use cursor keys to rotate your view on the spot - very much built for gamers with keyboard in one hand, first person view and mouse in the other. Couldn't find a run or fly control so walking around too ages. There is a nearby-TP option where you can point to a place and jump there - but a very short range.


The actual spaces looked pretty good - but they are just imports of 3D models so no reason not to. But interactivity was non-existent in the ones I saw - probably due to the complexity of the scripting. Almost all of them also seemed very dark - they give you lights for your scenes but it seems like many people aren't using them well.

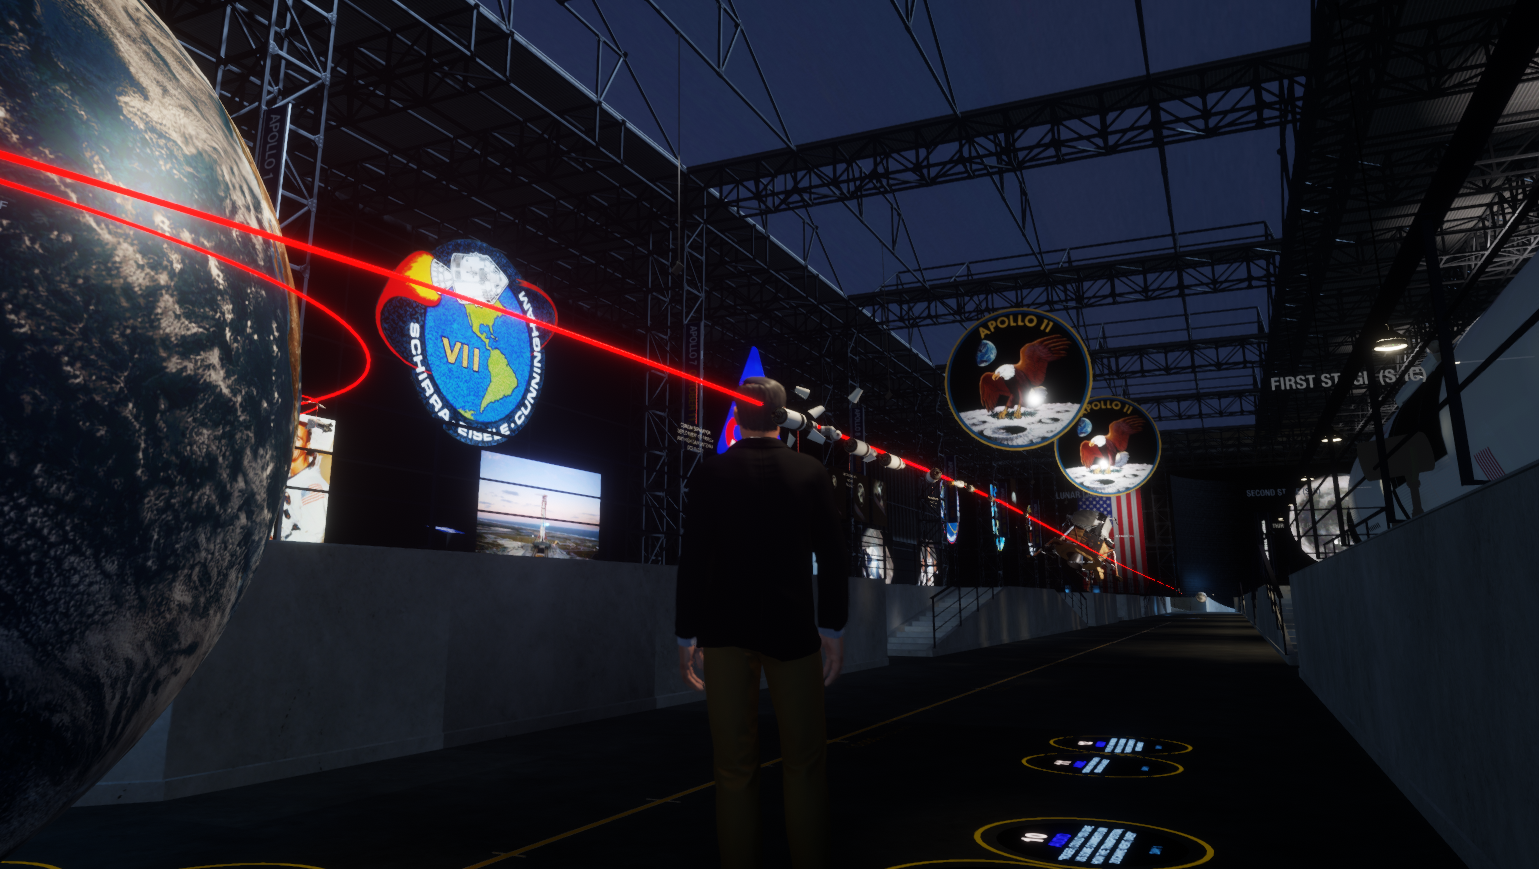
The one location that was stunning (especially in VR) was the Apollo Museum - with a really nicely done earth-moon trajectory and little CM/LEM models all along it and audio to show you what was going on - a superb VR demo.


Having done a quick tour I decided to try building so chose one of the ~8 base locations. Rather than buy from the store I decided to upload some FBX models - which was pretty smooth except for the fact that it appears they only get textured if the textures are PNG - and even then the ones I tried ended up all candy-striped!


One of the biggest issues for me though was that you had no avatar when building - so lose all sense of scale. No issue if you're a 3D artist, but for an SL renegade like me I can never get on with building without myself as a reference. Once you've done the build you save and then "build" - which can take a minute or so, before you can play (another minute or so), so again a slow iterative build process (and the "professional" builds were taking ~5 mins each to download.

Finally I wanted to try scripting. Before I started this morning (as as I tweeted) I thought I might be able to get a Sansar script talking to the bot I was working on, or even one of our PIVOTE APIs. No chance! Sansar scripts are pure C#. It seems at the moment you must edit outside (Notepad or Visual Studio), then import, attach, then build then run - it would take ages to do anything. The C# calls to interact with the environment also look non-trivial (subscribing to changes etc), and only a small subset of Mono/C# functions are supported - not the range that Unity has - so no web calls! There's no way that people will have an easy transition from LSL to Sansar CS - it's a whole extra level up.


So overall - massively underwhelmed. High Fidelity certainly looks far more interesting from a technical standpoint and is closer to an SL#2 - but even that doesn't have the single world thing. AltSpaceVR (if you added object import/placement) is far closer to what I thought that Sansar would be - and the WebGL enclosure idea was/is a superb way to create interactive 3D/VR content at minimal effort. The whole Sansar experience felt like working through treacle, whether exploring or building, - although in first person in VR at least the explore bit was quick.

What it did make me appreciate is what we've done with Fieldscapes. Using that has never felt slow. Its very quick to layout, add interactivity, test and explore - things just flow. And if people want to spend the time then there is no reason why you shouldn't have the same level of eye-candy as the Sansar spaces. But there is just no way that I can see Sansar being a training/education tool - you'd use native Unity or Fieldscapes or something similar, more power or higher ease of use, rather than Sansar which appears to cripple both. And the spaces don't have the immediacy of the AltSpaceVR ones, or the ease of build of the SL ones, so I don't see more casual users taking to it in great numbers. Perhaps if I had loads of time, was a coder/3d artist and wanted to build some sort of fan-space it might be a place to do it, but somehow I doubt even that.


14 August 2017

Delving into SpatialOS

SpatialOS is a cloud computing platform developed by the UK based Improbable that can be used for running large-scale simulated worlds, such as a massively multiplayer game (MMO), a virtual city, or a model of the brain. It is a technology that I first heard of in early 2016 and it has been on my radar since, and so I decided to look into it on the most recent DadenU day by working through some of the tutorials to see what it was all about.

There are a few core concepts to SpatialOS that are essential to understanding how it works. The two main concepts are Entities and Workers.

Each object that is simulated in an SpatialOS world are represented by what are called Entities. This could be a tree, a rock, a nerve cell, or a pirate ship. Each of these entities can be made up of components, which define certain persistent properties, events, and commands. An example would be a player character entity that defined a "health component" - this would have a value property, an event for what happened when it reached 0, and perhaps some commands that can modify the property in specific ways.

My ship in the watery world
All of the processing performed in the simulated world, such as visualising the world or modifying component properties, is performed by Workers.These are services that can be scaled by SpatialOS depending on resource demands. There are both server-side workers, handled by SpatialOS, and client side workers - the application that a user will interact with.

You are able to develop, debug, and test applications developed on SpatialOS on your local machine, allowing for small scale messing around to be done fairly painlessly. My plan was to work through the tutorials in the documentation so that I could get a feel of how to use the technology. The first lesson in the Pirates Tutorial series focuses on setting up the machine to run a local instance of SpatialOS and the tutorial project itself.

A command line package manager called chocolatey is used to install the SpatialOS command line interface (CLI) and stores the location in an environment variable. The source code for the tutorial includes a Unity Worker and a Unity Client. Included in the project is a scene with an empty ocean environment. All other objects, such as the islands and the fish are generated by a worker when the project is launched, and the player ship is generated by a client when it connects. The CLI was used to build the worker and launch SpatialOS locallyWith that the 'server-side' of the game was running and all that was left was for a client to connect to it. 

There are several ways that a client can be run, but the most useful for local development using Unity is to run through the editor interface. Pressing play will launch a local client that allows you to sail around an ocean as a ship. 


Observing pirate ships and fish using the Inspector tool
SpatialOS has an interesting web-base tool called the Inspector that lets you see all of the entities and workers in the running simulation. It displays the areas of the game world that each individual worker and client are currently processing - you even have the ability to remove a worker from the simulation, however SpatialOS will start a new worker instance if it feels that it needs one - and as there is only one required in the tutorial a new one was launched if I deleted the existing worker.

All of the entity types listed can be colour coded so that they are easier to follow when observed in the 2D top down view. There is a 3D option but I couldn't seem to get it to work on my browser. All of the components that make up the entity can be viewed as well, which leads me to believe that the inspector could be a fairly useful monitoring tool during development. The inspector is available on deployments on the cloud as well as locally. 

Other lessons in the tutorial take you through the basics step by step. The world was very empty to begin with and was in dire need of some more entities, so the second lesson takes you through the process of creating one from scratch. This is a two step process - the first is to write an entity template, and the last is to then use the template to spawn the entity within the game world.

Building the pirate ship entity template
The tutorial project uses a factory method pattern to generate the templates for each entity, so to create our AI pirate ships all we needed to do was create our own factory method for it. The entity object is generated using the builder pattern, and there are some components that are required in every entity generated - a position and a metadata component. The pattern also requires that you set the persistence of the entity, and that you set the permissions on the access control list (ACL) before any additional components are added.

Spawning of the entities in the tutorial occur at two distinct stages - at runtime when a player connects, and at the beginning when the world is created in what is known as a snapshot. A snapshot is a representation of the state of the game world at any specific point in time, and when you launch the project to SpatialOS you can define a snapshot to load from.

Every game world requires an initial load state and this is what a snapshot provides. In the case of the tutorial, the player ship template is used to spawn a ship when a user connects, and the pirate ship template is used to spawn ships in the snapshot we defined as default. To define a snapshot we created a custom Unity menu item to populate a dictionary with a list of all of the entities we want to spawn, including a whole bunch of our new pirate ships. Once the worker is rebuilt the client will not be able to see a whole host of static pirate ships within the ocean environment.

Generating a snapshot that includes pirate ships
Getting the pirate ships to move in the environment was next. The tutorial focused on the manipulation of a component's properties by creating a script that will write values to the ShipControls component of the pirate ship entity.

Access restrictions defined when attaching a component to an entity template determine what kind of worker can read from or write to the component. We can use a custom attribute to determine what worker type we want the script to be available for - i.e, the pirate ship is an NPC so we only want it to be controlled on the server side, so we lock the script using the attribute to only appear on UnityWorker instances.

Only one worker, or client, can have write access to a component at any given time, though more than one worker can read from the component. We add a writer component to the script we have created and ensure that it has the [Require] attribute - this means that the script will only be enabled if the current worker has write access to the component.  

To write to a component you use a send method that takes an update structure, which should contain any updates to the component values that need to happen - in the case of the pirate ship we want to update the speed and the steering values of the ShipControls component to get it to move. The worker was rebuilt again, the local client relaunched, and we had moving pirate ships! There was no decision making so they were rather aimless, but at least they were moving now.

Event data flow
Another important aspect of the components are the ability to fire of events. These are transient and are usually used for one-off or infrequent changes, as there is less bandwidth overhead than modifying properties, which are persistent. To learn about events we were tasked with converting locally spawned cannonballs to be visible on other clients.


Adding events to a component first requires knowledge of how a component is defined in the first place. SpatialOS uses a schema to generate code that workers can then use to read and write to components. These are written in what is called schemalang, which is SpatialOS' own proprietary language. An event is defined in this language using the structure: event type name. For example we defined an event that will be fired when a cannon is fired on the left of the ship like so: event FireLeft fire_left. 

Using our new FireLeft and FireRight events instead
of locally firing cannons
Events are defined within the component, and FireLeft is defined as an empty type outwith the component definition in the following fashion: type FireLeft {}. The custom types are capable of storing data, but that wasn't required for the purposes of the tutorial.

The code needs to be generated once the schema for the component has been written so that we can access the component from within our Unity project. The CLI can generate code in multiple languages (currently C#, C++ and Java). To be able to fire events we need access to the component writer so that when we detect that the user has pressed the "fire cannonballs" key we can fire an event by using the component update structure, like we have done when moving the pirate ships.

The script that contains callbacks that fire the cannons
hen an event is received
Firing an event is only half of the story as nothing will happen if nothing is reacting to the event being fired. In the case of Unity it's as easy as creating a new MonoBehaviour script and giving it a component reader as well as a couple of methods that will contain the code we want to run when we receive an event. These methods must be registered as callbacks to the event through the component reader in the MonoBehaviour script's OnEnable method, and must be removed as a callback in the OnDisable method. This is mostly to prevent unexpected behaviour and stop the script from receiving event information when it is disabled.

Next was a short tutorial that discussed how components are accessed by workers and clients. One of the key terms to understand is checked out. Workers don't know about the entire simulated environment in SpatialOS and instead only know about an allocated sub-set of the environment, called a checkout area. They have read access to, and can receive updates from, any entity within this designated area. I mentioned earlier that more than one worker can have read access to a component, and this is because the checkout areas of a worker can overlap with that of another worker; meaning that an entity may be within the area of multiple workers. This is also the reason that only one worker can have write access to a component at any given time.

The ShipControls component's full schema
The final tutorial that I managed to complete before the day ended walked me through the basics of creating a new component from scratch, in this case a "health" component that could be applied to ships so that cannonball hits would affect them on contact.

As mentioned before the component is defined in schemalang. In the schema file you define the namespace of the component as well as the component itself. Each component must have a unique ID within the project and this is define in the schema file. The properties and events of the component are all defined here (eg the Health component has a "current_health" integer property). You can also define commands here but I believe those are covered in the final tutorial.

After defining the component the code has to be generated once again so that the new component can be accessed within the project. Adding the component to an entity is as easy as modifying the template for whichever entity you wish to add it to. Reducing the health of a ship in the tutorial was as simple as updating the current health of the health component whenever a collision was detected between the ship and a cannonball - using a mixture of Unity's OnTriggerEnter method and a writer to the health component I defined.

Writing to the new Health component
In conclusion I think that SpatialOS was actually fairly simple to use once it was all set up. I did attempt to launch the project locally but I never managed to get it consistently working in the short time I had left. The biggest drawback to the pirates tutorial is it didn't give me much of an idea of the main attraction of SpatialOS, which is the ability for there to be multiple workers running a simulation in tandem; for the entirety of the tutorials there was need for only one worker. I'm very curious to see how SpatialOS as a platform develops in the future, as I feel it could have some interesting applications.